


Summary
-
Control your steam deck using a real mouse and keyboard connected to your primary computer on local network connections using virtual KVM.
-
The free app input leap lets you move between your Windows, Mac or Linux desktop and steamos without relying on the trackpad or on-screen keyboard.
-
This guide is included in steam deck and any other hand that uses steamos.
Control your steam deck with your Mac, Windows or Linux PC to avoid using on-screen keyboard and small trackpad. Share a clipboard and originally go from one screen to another, wireless manner and local network. This is free and easy set up, how it is here.
How it works and why it deserves it
Your computer- Whether it is running MacBook, McOS, a Windows Gaming Machine, or a Linux Tiny PC – is already a good set of peripherals. Even if you are using a laptop, the underlying keyboard and trackpad simply you may need all.
The steam deck is mainly designed for use in game mode, a controller-friendly UI that makes the store easier to browse, launch games and access the most basic settings. But the steam deck also has a desktop mode, a completely Linux environment that is required to use your steam deck for advanced operations or like a “real” computer.

Connected
How to use your steam deck as Linux PC
Your steam deck is not just to play games.
However the desktop mode is fully compatible with the underlying trackpad, joystick and button out of the box; Controlling it is far away from pleasant. You can connect the external pointing device and keyboard to your steam deck, but what is already good external devices on your desk?
Generally, you can use a KVM (small for “kernel-based virtual machine”) to switch the original between two or more operating systems on the fly. This technique is often made in monitor or made around a dedicated piece of hardware known as KVM switch. Fortunately, there is a simple way.
With a virtual KVM, you can add this functionality to your Windows, Mac or Linux machines (including steam decks). If you do the server with a machine (with the server (host “of your keyboard and mouse, if you do), you can design other machines as a client device. When you move your pointer from one edge of the screen, it will magically appear on the other.
For steam deck users, it is very good for almost any desktop mode operation. Even though I have done my steam deck OLED for more than six months and spent a proper time to move away in desktop mode, I have not come with on-screen keyboard and Flooti trackpad. This is fine in a pinch, but you cannot beat the real thing to do things quickly and efficiently.
A virtual KVM is perfect to manage files with a real mouse, typing long terminal commands in Konsole, using a web browser on your steam deck to download things locally, or browse the Discover Store. Select copy, paste, and all tasks as you expect, and select more utility as a “real” computer in the steam deck when you use it with some “real” peripheners.

Connected
10 non-stem apps you should install immediately on your steam deck
Make your steam deck even better.
You can really use your steam deck to use as an additional monitor on your desk and its benefits are running on the heavy modified version of the arch linux as a completely separate machine. I am currently below my MacBook (which is on a laptop stand), so I can watch YouTube videos and live streams.
He said, I will not use this solution for gaming due to added delay. It is not super-notable under regular desktop operation, but for responsible control you should take a moment to connect or pair your mouse or keyboard directly.
Set your KVM server
For this, we will use the Open-SUS Virtual KVM app Input leapThe project was once known as a barrier, but the previous project retired in 2021. Both devices need to be shared to the same local network.
Most of the major operating systems, including Windows, Mac (with separate seques silicon and intel -release, which both do), are available for major operating systems, and binergles for Linux Distroses like Debian, Fedora, Ubuntu. You can also find it in other package managers (it will be useful later).
The first step is to download the input leap on your server – the machine you are using to control your customers. I will use a Mac, but the normal setup process should be almost equal savings for safety safety measures in addition to Apple.
With the downloaded app, install it and run it. On my Mac, I had to go to system preferences> privacy and security and then click “Open” anyway to run the app as it is not signed. Finally with the app, I approved the requests permission to control my Mac.

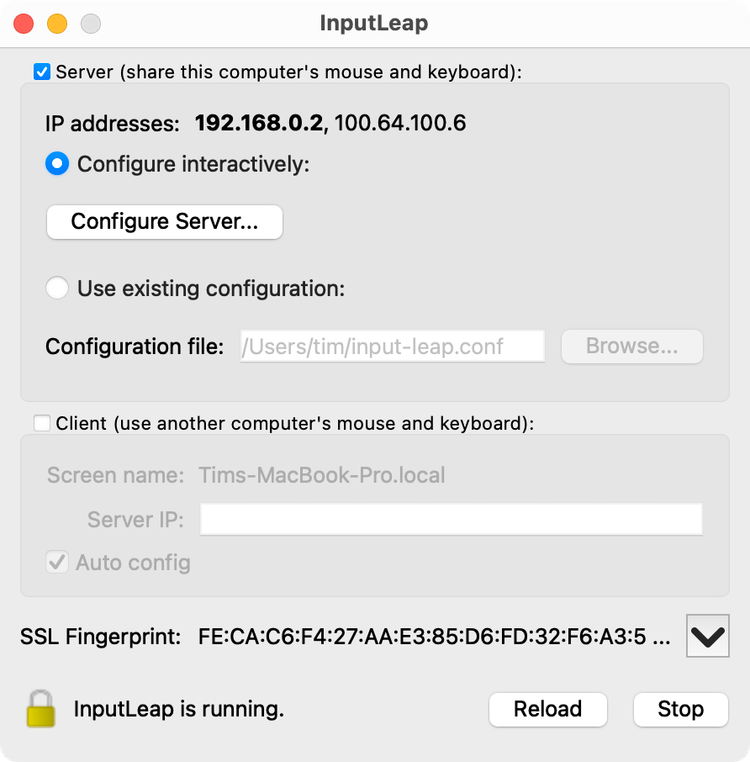
Finally, with the app, there is a brief setup to run through the wizard. Inspired to do this, nominate your computer as a server, and then click on “Configure Server” to see the “screen and link” setup panel. This is where you configure where your steam deck (and other screen) will appear. Click and pull the screen icon in the top-right corner.

Now double-click on the “Untitledal” screen which you just added and named it “Steamdeck” under the “Screen Name” and then click on OK.

On Macos, I had to take the following additional steps to work input leap:
Open the application where the app is installed, find the “input leap” application, then right-click on it and choose “Show Package Matter”. Now navigate the content> Macos and draw the “input-leip” file into system settings> privacy and security> accessibility window.
Make sure that you are capable of both app and process in this window before closing it. Ensure that you allow the app to search for equipment on local networks if it is motivated to do so.
Now that input leap has been configured, click “Start” to start the server.
Set your steam deck as virtual KVM client
Now it is time to repeat the process, except your steam deck. Fortunately, it is easy to install the app for its inclusion in the Discover Store.
If you are in game mode, press the power button on top of your steam deck and then choose “Switch to Desktop”, then wait to load the steamos desktop.

Once you get inside, launch the Discover Store using the steamos menu or shortcut in the taskbar at the bottom of the screen. Now find “Input” by moving the cursor with your correct trackpad and clicking in the search box with the right trigger. Hit Steam+X to bring an on-screen keyboard.
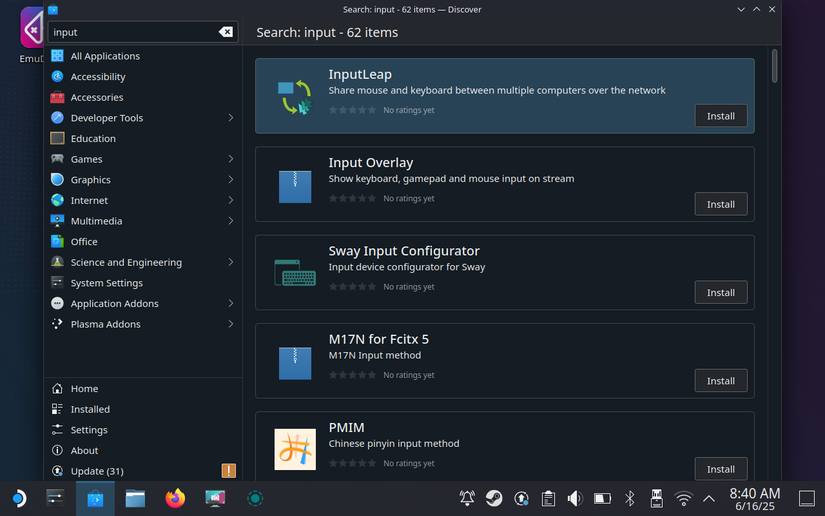
When you appear “input leap”, click “Install” and wait a few minutes to complete the installation. Now you can launch the app from the steamos menu (you will find it classified under “Internet” or you can find it). Now you have to run through the same setup process as you did earlier, except this time, design your steam deck as a client device.

Finally, the input will be ready to start the leap. Double-check that the “screen name” below the client box is the same as you used in the first initial setup. Click “Start” and you should see a window that is asking you if you recognize the device that is asking to connect, click “Yes” and your KVM setup should be completed.

A better steamos experience
Now you can take your mouse cursor to the edge of the screen, which you nominated in the initial setup so that it can jump on your steam deck. When you do this, your keyboard control will also switch to the steam deck. You can do everything type, click, drag and such as your keyboard and mouse were directly connected to your steam deck.
A “appropriate” KVM is running all the time, and this can also be a solution. Although the input leap will wake up your steam deck display, it will not wake up your steam deck from suspended (which occurs after a few minutes of inactivity). You have to change this setting under “power management” preferences in the system settings of your steam deck for “allways-on” solutions (just know about the implications of the battery drain to do so).
I have left everything normally because I only need the time when my steam deck is on. The clipboard sharing works great for sharing text, allowing me to copy the long terminal command on my Mac and paste them directly into the consol.
You should also add input leap to your steam deck startup items, accessible under system settings> Startups and shutdown “Aid” under “Aid” button and detect input leaps from the menu. You can do the same on your Windows, Mac or Linux host machine.

With your virtual KVM always walking, booting in desktop mode on your steam deck you can control your hand immediately with your main computer keyboard and mouse.
It has been a full game-changer for my steam deck in virtual KVM desktop mode. Now I do not have to mess up with plugging a physical keyboard in my steam deck, and I can achieve things faster than relying on the trackpad.
It goes without saying that it works on any handheld that runs steamos, including Lejan Go.
Connected
Stemos gave a battery life to my lion, which is always worthy
Finally I am free from Windows’s hunger for electricity.